HOWTO: Run BOINC / SETI@Home over a Samba Server
October 1, 2013
I did an interesting project this weekend, and as it may be useful to others, I will lay out the details here. You will not have the same specs or requirements that I did precisely, but the general concepts may still apply.
This all started with the then current version of BOINC in Linux appearing to be suddenly wonky (that's a technical term). For many a year I ran the Windows version of BOINC in Linux under Wine. That works fine and sets up quickly (see post elsewhere in this blog). The Linux version has long been difficult to set up for security and rather poor and limited documentation reasons, but three months ago, I wrestled that particular dragon and got BOINC in Linux running. That worked beautifully for three months, then got wonky.
By wonky, I mean that the calculations seemed to be moving backwards and the stats did not appear to completely add up. In fact, this was probably not an issue with the Linux BOINC client at all. The BOINC version was just upgraded by Berkeley, and from comments from other users, I assume now that what I was seeing was probably just growing pains from the new upgrade being tweaked.
Nonetheless, it got me playing around, this wonkiness. What I finally arrived at was the decision to rip everything out and do it differently from the ground up.
Here is what I started with:
-
A Linux box running CentOS Linux 6 with Samba already running for file and print sharing.
-
A cheap laptop running Windows 7 Professional. The laptop has a decent processor and memory, wifi, and not a lot of disk space.
-
An extra hard disk in the Linux box. I use this for experimentation, virtual machines, now BOINC as well.
Even though BOINC is pretty
low drain, it occurred to me that I may as well not hammer
on the main hard drive (OR on the laptop hard drive) for
BOINC for a couple of reasons: I have the extra drive to
read and write to, both myself and BOINC will benefit by
using a rarely used drive for reading and writing, and
with what I had in mind, the drive reads and writes for
BOINC would include two BOINC clients, not just the one.
Better to use the experimental extra drive for BOINC.
- Setting up the Windows Client to
run over the Samba Server
I backed up the files on the experimental drive then used
the Linux tool gparted to slice off a fraction of the
experimental drive and create a separate 2 GB partition.
First, note that messing with the partition of a formatted
drive is DANGEROUS (he said in capital letters). You can
LOSE YOUR FILES on that drive permanently. I was hopeful
that this would work because I only wanted 2 GB of space
and gparted is fairly flexible. In fact, I did not lose
the files on the drive after I changed the partition.
2 GB is not a lot of space,
but if you look at the SETI@Home BOINC requirements, they
are measured in the Megs or 10s of Megs. As I said, BOINC
has low requirements as an application. 2 GB was probably
overkill for what I would do. With a couple of days of
work in queue, here what it the 2GB partition looks like:
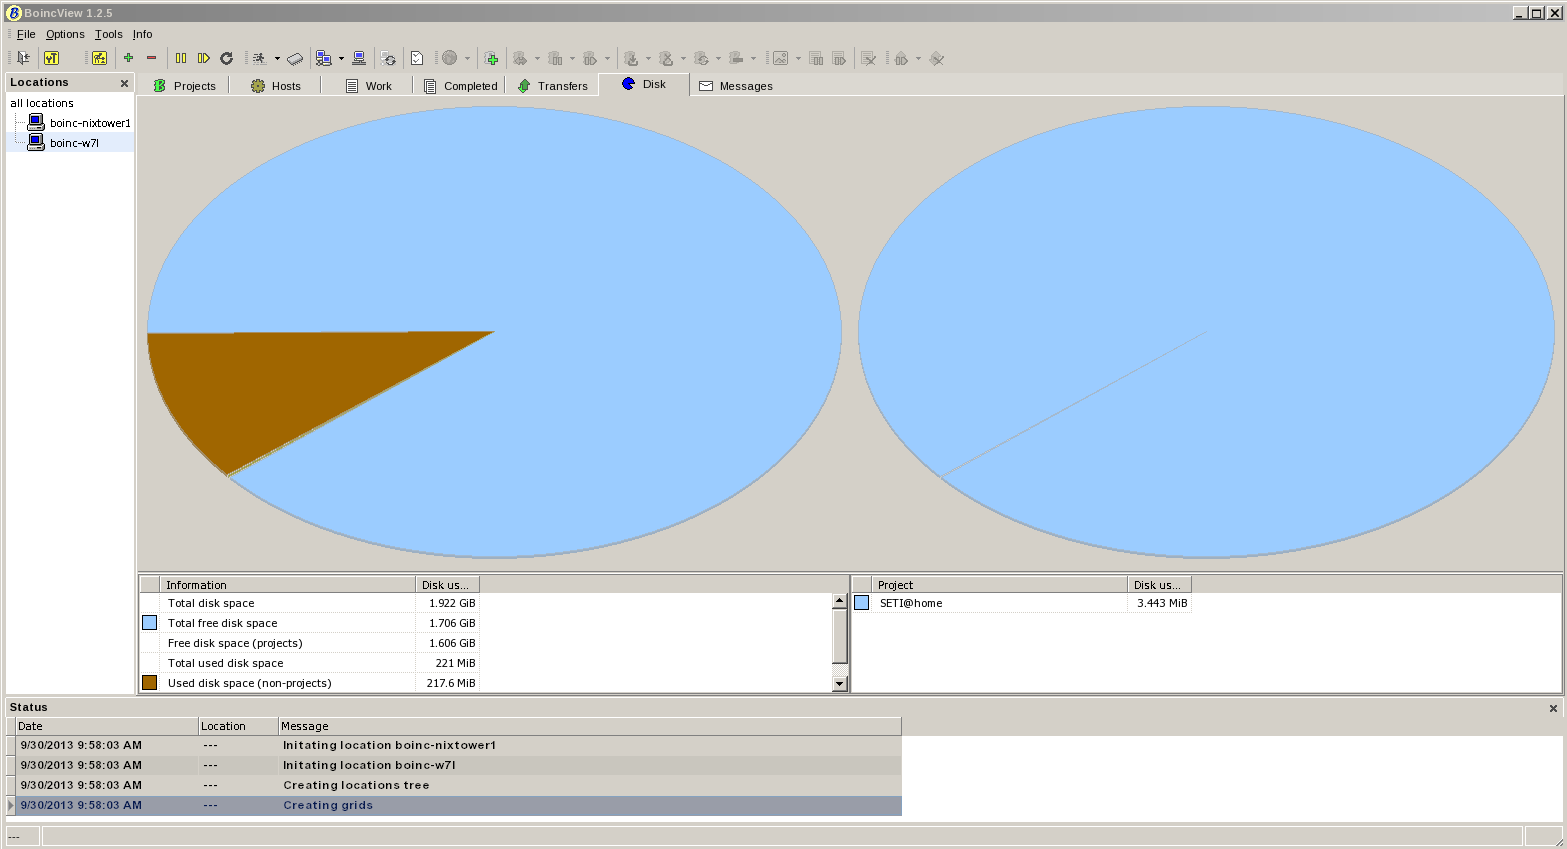
Plenty of space to expand,
almost nothing being used.
From the above, you may guess that this is the partition to be used by Windows. So, we'll continue with the Windows setup for now. From the BOINC web site, get the current Windows installer. You will be installing in Wine to a specific known drive letter. By 'specific known drive letter' I mean that you literally want to go into Wine's settings and tell Wine that the drive letter (in my case, drive letter t:) equals a specific Linux location (in my case /home/samba/boinc-w7l):
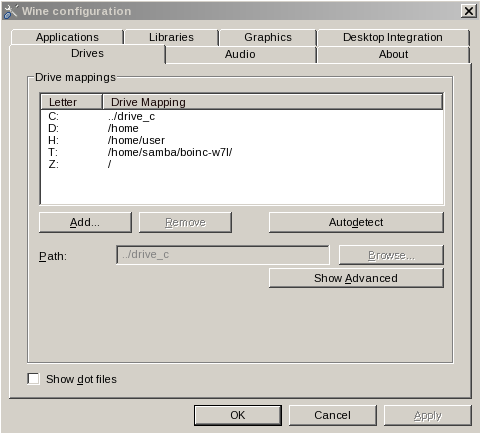
So I literally installed to drive t: knowing that the Windows laptop which would be running this install has drive t: available in the drive letters mapped in the Windows network. Why is this so? The BOINC installer seems to write the drive letter the user selects into the installed software at the time of install. You cannot change it later. So if you install to drive t: you can only run that install of BOINC on drive t:. Even though I used Wine to run the installer, and Wine will not be running the software, the rule applies: BOINC wrote drive t: to itself when Wine installed it, so drive t: must be used in Samba, even though Wine will not be involved in the actual operation.
This brings up a good point. If you have to move all of the installed files and folders to a different Samba share later on, you may do so. All that you have to do is access the different Samba share with the same drive letter as the letter you used in the BOINC installer. Knowing this in advance, you can plan accordingly by choosing a drive letter which is available on the Windows Samba client.
Now exit completely out of
Wine. Wine's job is done (for now) once it installed the
BOINC software somewhere accessible. In other words, do
not use Wine to run the BOINC software just installed.
That would cause BOINC to run on the Linux box's resources
and we do not want that.
Instead set up a Samba share,
thus:
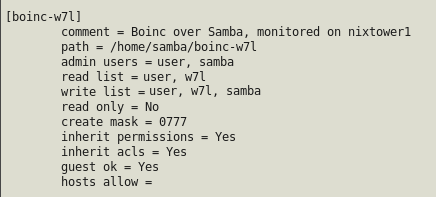
A couple of things are notable
above. First, the Samba server was edited in SWAT. If you
do not have SWAT, you should not be using Samba, in my
opinion. Now let's look at this Samba share definition. It
gives my user account and the Windows 7 laptop access to
the new Samba share. Note also that the Samba share is the
same folder as we used to install in Wine:
(/home/samba/boinc-w7l) Further note that
/home/samba/boinc-w7l is still the dedicated 2GB partition
for the Windows client. I set the create mask and
inheritance values as I did since BOINC will need read,
write and execute functions in order to operate
uninterrupted. Since the 2GB partition is dedicated
solely to the Windows version of the BOINC software, this
is not overly permissive permissions for this Samba
share. While in SWAT, restart the Samba server.
- The Windows Client
Next, go to the Windows laptop and map network drive t:
and, optionally, add Start Menu items for t:\boincmgr.exe,
t:\boinccmd.exe, t:\boincscr.exe as desired. This might
cause BOINC to launch when Windows 7 starts up.
However BOINC may also start
to load but then crash if you use the Start Menu to launch
it. In that case, use the Windows Task Scheduler to
create your BOINC launch shortcut and set the task that
you create to launch 30 seconds to a minute after login
(this delay will make sure that your network has time to
come online fully before Task Scheduler tries to launch
BOINC). You also have other interesting options in
the Task Scheduler such as not loading BOINC if a specific
router is not available, etc. You can select from these
options as desired.
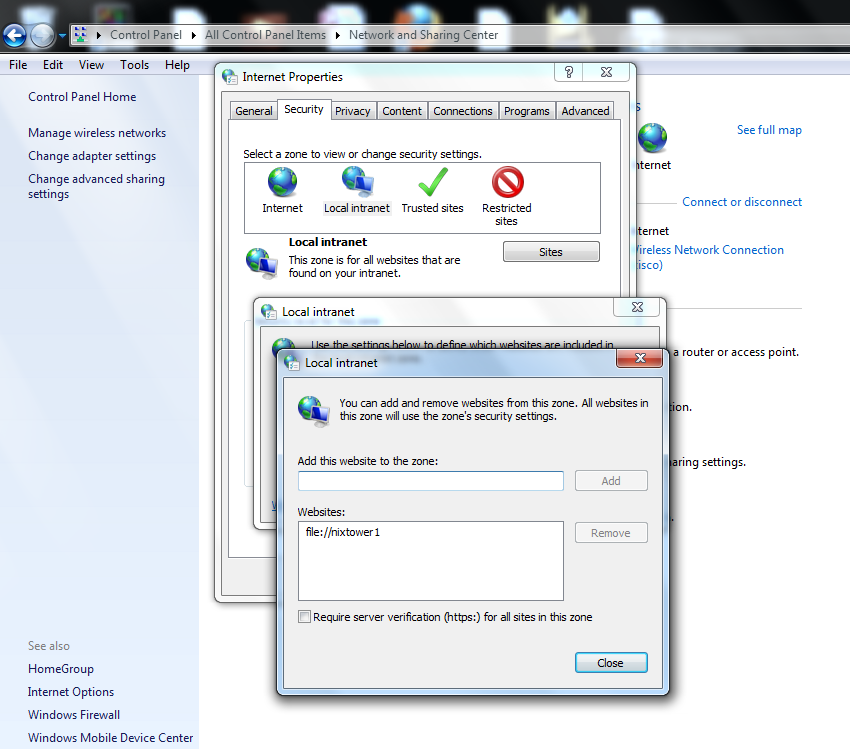
If Windows complains about the location (drive t:) not being trusted, the following resolves that issue: Do Control Panel, Internet Options, Local Intranet, Advanced. Add the network containing your t: drive:
- Troubleshooting and Adjusting Variables in the Windows Client
While you are fiddling Windows client settings, there are
other settings which may be important. First,
understand what BOINC is. BOINC is a framework under
which many different distributed computing projects
run. Largely these different projects running under
the BOINC framework have different processing
specifications and so take advantage of different
capabilities of the client computers. Therefore, you
will need to adjust variables in the BOINC GUI to reflect,
not BOINC itself, but the specific @Home project that you
are crunching numbers for.
BOINC is a distributed computing project, and as such it distributes project work units to millions of client computers. It is obvious that the system capabilities, age of the computers, operating systems, user workload and technical specifications of these client systems will vary widely. Therefore, what needs to be tweaked for one computer may not need to be tweaked for another and may need to be tweaked in another way altogether for a third computer, and so on. Here are a few tweaks which may or may not be necessary and may or may not provide stability and efficiency based on your own equipment specifications and setup.
- GPU processing. As an example of this difference in the capabilities and requirements variable, the SETI@Home project does not take advantage of the GPU for additional processing capacity with some video chips, but does with other video chips. So, even though the BOINC GUI has an option to permit using the GPU, that option may need to be disabled if you are crunching numbers for the SETI@Home project. A help page covering which @HOME projects can use which GPU chipsets can be found here: http://boinc.berkeley.edu/wiki/GPU_computing but for now, just keep in mind that not all video chipsets can provide GPU processing capabilities for all @Home projects, even though the BOINC GUI provides GPU processing as an option.
- Windows Firewall. Under Control Panel, bring up the Windows Firewall and give permissions to BOINC.EXE to contact the outside world. This may not be required depending on whether you are normally using Windows 7 from the admin account (you don't do that bad security thing, right?). However, if you do see a message that the Windows Firewall blocked BOINC, this is where to fix it.
- Compatibility Mode. Running BOINC in compatibility mode as Windows XP Service Pack 2 or Service Pack 3 may resolve some BOINC stability issues and seems to work without a problem. I used the Microsoft Application Compatibility Toolkit, a free Microsoft download, to adjust this setting for the BOINC software.
- Review the Event Log in the event of instability or
problems. The Event Log is a Windows 7 feature and is
found under Control Panel, Administrative Tools.
If BOINC is having stability issues and crashes, the
reason, or at least a troubleshooting clue, may be
listed here.
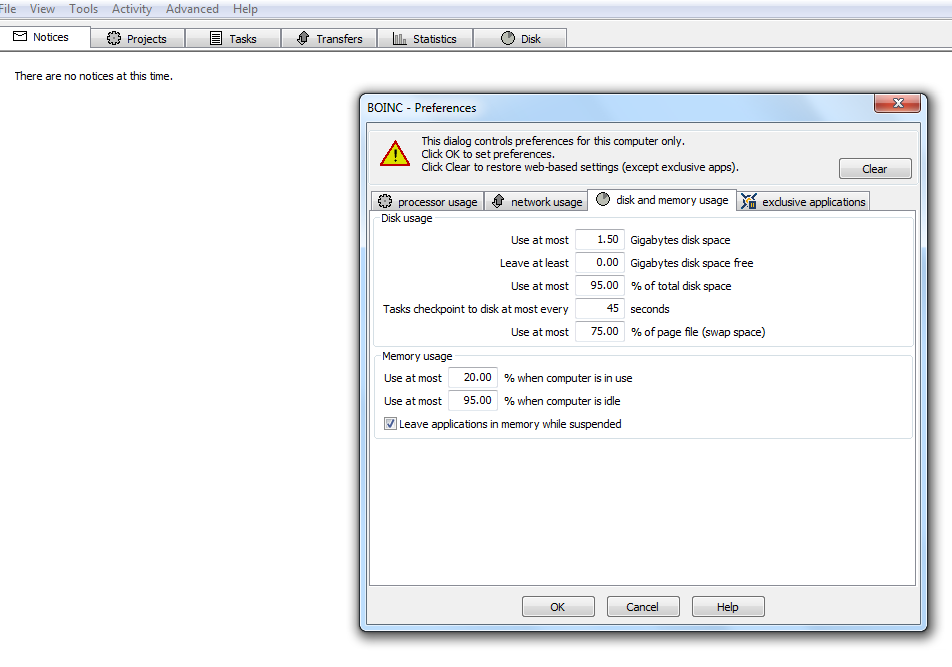
- Specify the amount of disk space BOINC can use.
In the BOINC GUI under Advanced View, set the disk size
to whatever you want BOINC to be able to use. As
we saw above, not very much disk space is required or
allocated in the BOINC partition I set up, so I gave
BOINC 1.5GB of disk space, which is plenty.
- Specify the memory and processor amount BOINC may use
in the BOINC GUI. On some systems it may be
necessary to permit 100% of resources to be available,
while also creating a list of exclusive
applications. Exclusive applications is a new
feature in BOINC. This feature causes BOINC to
automatically suspend processing when any of these
exclusive applications are in use. So the computer
might use 100% of resources except when you use
Microsoft Word, Internet Explorer, etc.
- Specify how often your client communicates with the network drive. I found that with my Samba network, it was helpful to increase that time to 90 seconds from the default of 60 seconds.
- Exclude the BOINC drive or files from virus scanning
or drive indexing. This was a suggestion for
stabilizing BOINC on some clients from a BOINC help
reference. Like giving BOINC access to 100% of
resources, only you can decide if this is necessary or
if you will allow it.
- Turn off Windows clock synchronization. You can access this by right clicking on the Windows clock. Your clock will no longer update system time or automatically change to Daylight Savings time. Again, only you can decide if this is necessary or if you will permit it.
- Back out changes one at a time. For example, if
you turn off clock synchronization and virus scanning
and give BOINC 100% of resources, and BOINC runs well,
tweak one feature at a time back on or down. So,
you may turn on virus scanning and monitor for at least
24 to 48 hours. If BOINC remains stable, try
tweaking another setting and again monitor for a couple
of days. Tweaking multiple features at once will
not let you know what may be causing stability issues.
Let's take a moment and think about what actually is
happening on the Windows 7 side now...
The BOINC software exists physically on the Linux box (experimental hard drive, 2 GB partition). It does not consume limited Windows 7 laptop disk space.
Also, since the Windows 7 laptop does not use its hard drive, the Windows 7 laptop appears to be powered off on the surface. It is using relatively little resources. The screen saver eventually locks the laptop, then powers the display entirely off. All power lights EXCEPT hard drive activity stay on regardless. The display is totally off. The laptop is totally silent. The hard drive indicator on the laptop shows no activity at all.
This is not surprising. BOINC
over Samba does NOT read or write to the Windows 7 laptop
hard drive. BOINC is installed in the Linux drive. All
data is read from the Linux drive over wifi, crunched on
the Windows 7 laptop processor and RAM and the results
written over wifi back to the Linux experimental drive.
The results are that the Windows 7 laptop resources of RAM
and processor and GPU are used, laptop hard drive is not.
As a result, the Windows 7 laptop operates at a speed the
Linux box does not.
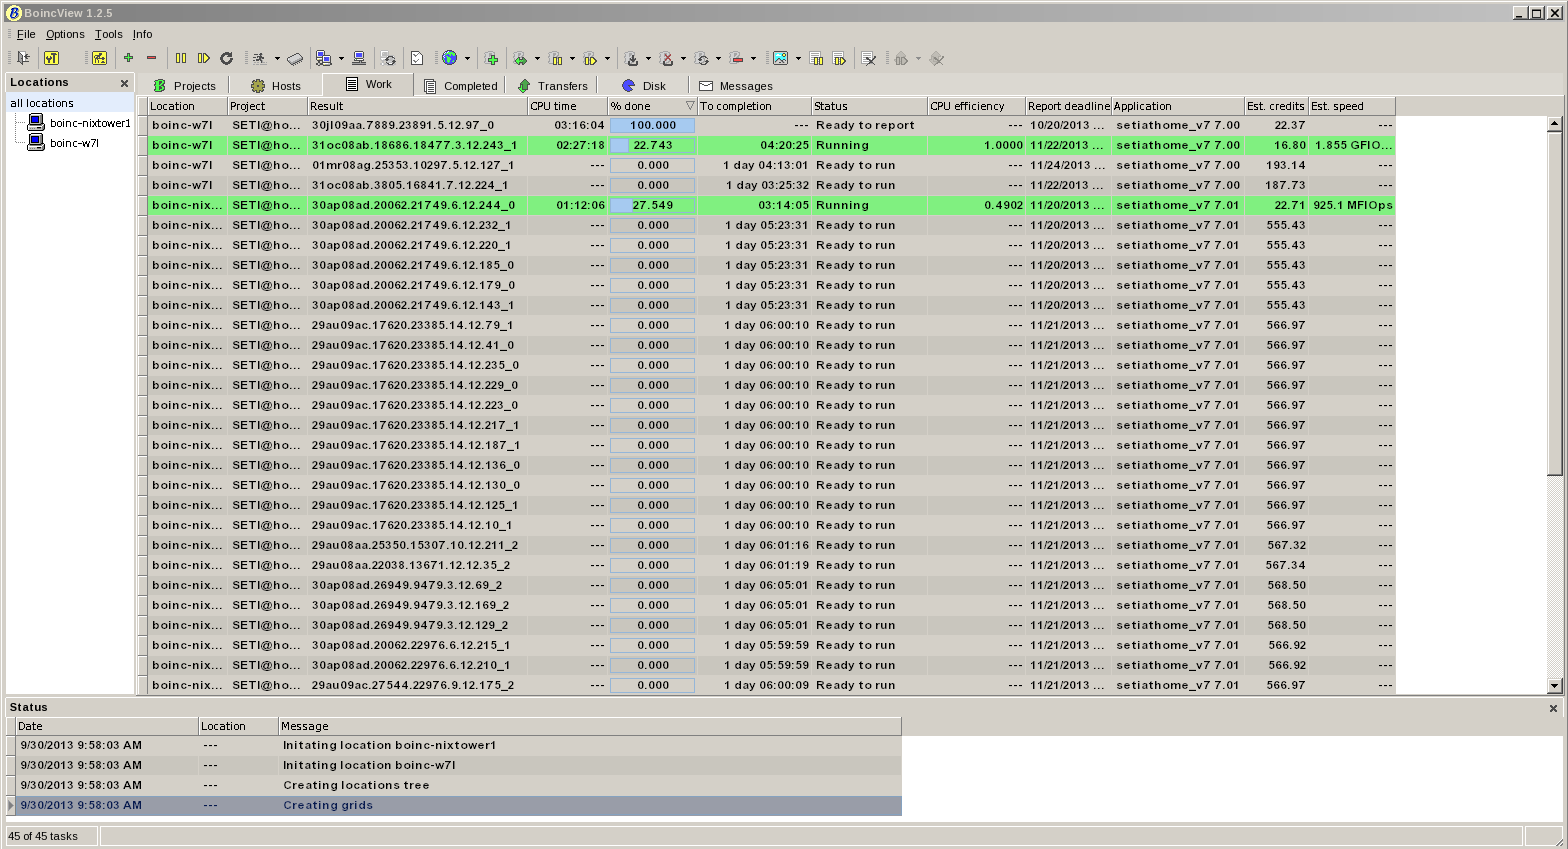
Note the CPU efficiency and
estimated speed columns for the laptop. The laptop
crunches SETI@Home numbers at 100% efficiency and twice
the speed of the Linux box (although the numbers fluctuate
a bit). This is hardly surprising. The RAM and processor,
and not the hard disk are crunching numbers on the laptop
with no other operations. The Linux box is also
coordinating the whole show. Let's next look in greater
detail at what the Linux box is doing while the Windows 7
laptop plugs away silently.
- Extra Credit. A Second BOINC client on the Linux Server.
First, the Linux box is crunching its own numbers for
SETI/BOINC. This is also read from and written to the
experimental extra hard drive. The same philosophy
applies: The Linux box's main drive is used by yours truly
for daily tasks including maintaining this web page, the
experimental drive is used for extras like BOINC.
Add to these requirements that since I am running two BOINC clients, I want to monitor them both on my Linux box. Since I want to monitor them both, the default BOINC GUI in Linux is not helpful. Since the default BOINC GUI is not helpful, I do not use it on the Linux box. Instead, on the Linux box I run the command line BOINC client as below. Note: from here on, we assume that the Windows client is largely up and running...we move here to the BOINC client running on the Linux box.
The Linux command issued is:
/usr/bin/boinc_client
--attach_project http://setiathome.berkeley.edu
9999999999999999999999999 --no_gpus --allow_remote_gui_rpc
--no_priority_change --dir
/home/user/vworld1/boinc-nixtower1/
What this means in English is:
-
Execute the program /usr/bin/boinc_client (the command line version, NOT the GUI, right?)
-
Attach to the SETI@Home/BOINC project using MY long personal key (you received this when you registered with BOINC). [Also note, I have replaced my long personal key with a string of 9s for this blog.]
-
Use no GPU (graphics processors). My Windows 7 laptop has a distinct GPU, but the graphics chip in the Linux box does not.
-
GUI RPC is important later. It is what will permit the BOINC monitor to report activity on both running BOINC clients, so for now, allow. We'll come back to this later.
-
No priority change means that this is my daily use machine. I want most processor activity available to myself for most tasks. BOINC can have the remainder.
-
The directory is important. This is an override. It forces BOINC to use the directory /home/user/vworld1/boinc-nixtower1/ In fact, this directory is actually a redirect to the experimental hard drive as mentioned above. This does not refer to the 2GB partition above, but rather to the rest of the experimental drive, so that this drive (for the Linux client) is sdc1 and the 2GB partition (for the Windows client) is sdc2. As with the Windows 7 laptop, the Linux client now uses a hard drive for BOINC reads and writes which is not used by my daily tasks.
- The Monitor: See BOINC run. Run, BOINC, run.
So BOINC is up and running in Windows 7 and Linux. How can
we be sure? How are we to know that a BOINC client has not
crashed, and also, for SETI@Home purposes, quite frankly
we somehow like to SEE that we are accomplishing something
in the ongoing search for little green men. For
monitoring we use another piece of software entirely.
First, for a brief review, at this point, the Windows 7
and Linux BOINC clients are running, or at least we assume
that they are. Let's now see if that's so...
I use the Linux box for daily
tasks, so that is where I want my monitor. I chose
Boincview as monitoring software. Being copyright 2006, it
is either stable and secure at this point or not. The
problem is, it is a Windows application, and not Linux.
Here we go back to Wine in Linux. Boincview does not
'install' as the BOINC for Windows application installs,
instead it just runs as downloaded. I launch and run
Boincview through a Linux shell script:
/usr/bin/boinc_client
--attach_project http://setiathome.berkeley.edu
9999999999999999999999999 --gui_rpc_port 31417 --no_gpus
--allow_remote_gui_rpc --no_priority_change --dir
/home/user/vworld1/boinc-nixtower1/&
sleep 5
cd /home/user/vworld1/boinc-nixtower1/boincview/
wine boincview.exe
This starts my Linux command line client and then launches Boincview under Wine.
To review briefly, we have started the Windows 7 BOINC client on the Samba network. For our purposes, assume it is up and running. We have now configured and started the Linux client locally. For our purposes, let's assume it is also up and running. Now we move on to our goal of monitoring both of these clients to be sure that they are running continually.
Remember above that I
mentioned that we would come back the the RPC GUI option?
Well, we're coming back to it now. (I am copying (and
adapting significantly for our purposes) the next three
instructions from another website called [BOINC] Setting
up BoincView (windows) at
https://secure.dslreports.com/forum/r15201703-) On each
client, you need to do 3 things.
First, you need to obtain its BOINC password. This is
found in your BOINC install directory (in our case,
/home/user/vworld1/boinc-nixtower1 AND ALSO from
/home/samba/boinc-w7l). Open the files (both of them)
named gui_rpc_auth.cfg. Use either notepad, leafpad, or
your favorite text editor. The code you see there are the
passwords for each of the two BOINC clients (Windows 7 and
Linux) we will be monitoring.
Second, you need to create a text file named
remote_hosts.cfg This file needs to have the IP address of
all of the boxes to which Boincview will be listening.
This file can be created using notepad, leafpad, or any
text editor, and must be plain text. If you use notepad,
make sure that the saved file does not have .txt at the
end. Note: You may add additional IPs to the file to allow
multiple Boincview monitoring if you wish. Put one copy of
the same file in each BOINC directory. My copy of the file
remote_hosts.cfg in both BIONC folders reads
192.168.1.101
192.168.1.103
127.0.0.1
The first entry is my Linux tower, the second, my Windows 7 laptop, the third is not technically used and you may not need it. Since I am running a BOINC client on the same computer as I am monitoring it, I found it helpful to add. Your results and needs may vary depending on your setup.
Last, restart the BOINC service. This will activate the remote_hosts.cfg file and allow RPC access.
Since the Boincview in Wine
execution only consists simply of the scripting
cd
/home/user/vworld1/boinc-nixtower1/boincview/
wine boincview.exe
let's assume that you have Boincview running in Wine on the Linux box. However, it shows nothing at all because you have not yet told Boincview about your BOINC clients (Windows 7 laptop and Linux command line version, both of which we assume are running at this point).
To access Boincview, double
click on the taskbar icon. In Boincview, start with this:
Click 'Open the locations setup'.
For each location added, name your new connection something relevant (like boinc-nixtower1 or boinc-w7l) Select 'Get data via network access'. (Hint: Using the other option (Get data via direct file access) will work at first, but quickly drops back offline.) Add the IP address from your router for each computer (in my case 192.168.1.101 for the Linux box and 192.168.1.103 for the Windows 7 laptop). For the port in the location settings, the default is 31416. I used that port for one machine and used 31417 for the next. For the password, use the password found in gui_rpc_auth.cfg in EACH COMPUTER'S RESPECTIVE INSTALL FOLDER.
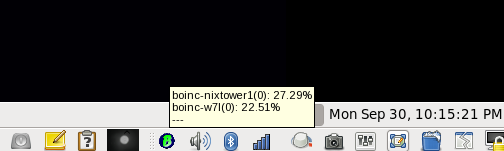
That's pretty much it. You
should now be able to roll over the taskbar icon and see
something like this:
Double clicking on the Boincview icon and selecting 'all locations' shows something like this under Hosts:
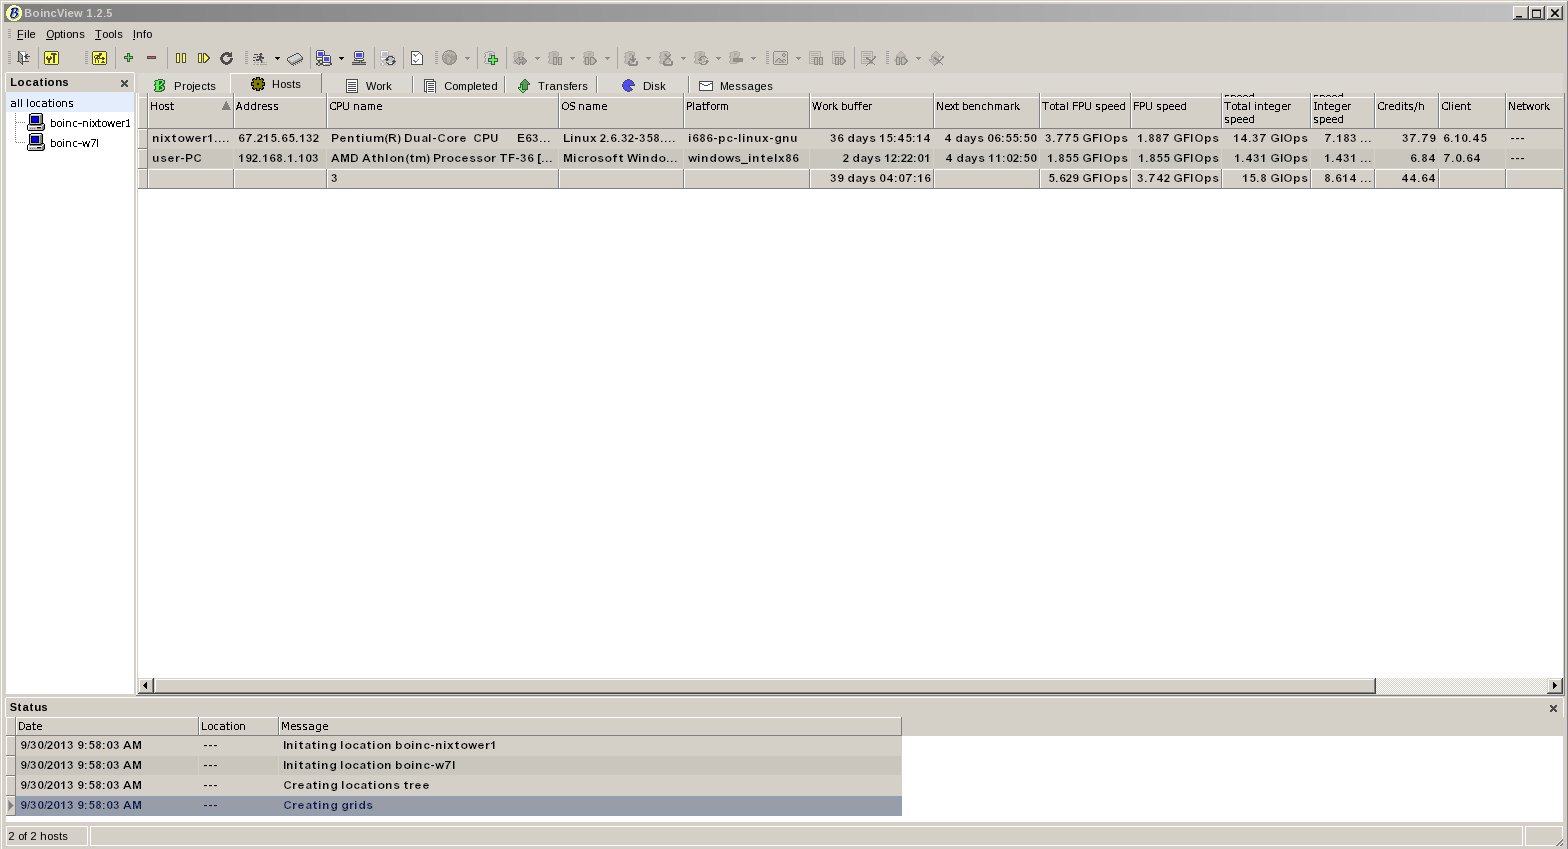
That's it, you're done!
Share this on ![]() witter or
witter or ![]() acebook.
acebook.